3x3 LED GRID
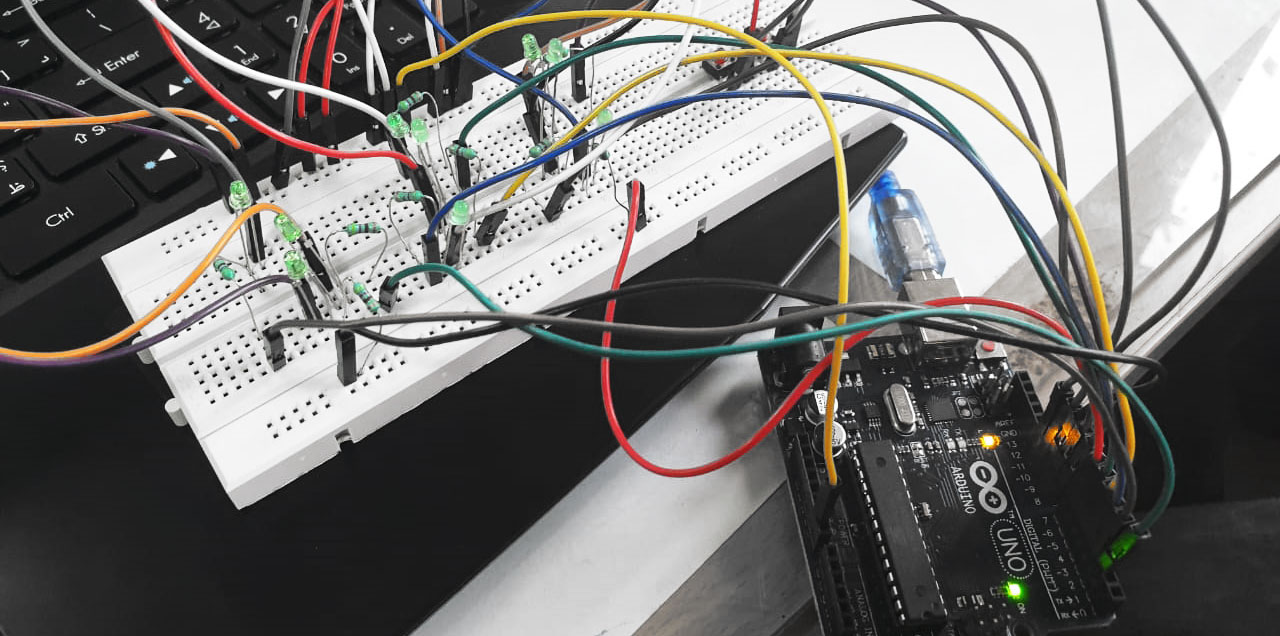
The objective of the assignment to create groups of two and create a grid of 9 leds and spell names our names out. To this, we learnt basic arduino programing for LED. Using the Arduino UNO that we have we started by creating multiple circuits for control over each individual LED. Metioned below are the components we need to build this setup:
- 9 LEDs of preferable the same colour
- 9 Resistors
- 23 cables
- Arduino UNO
- A Breadboard
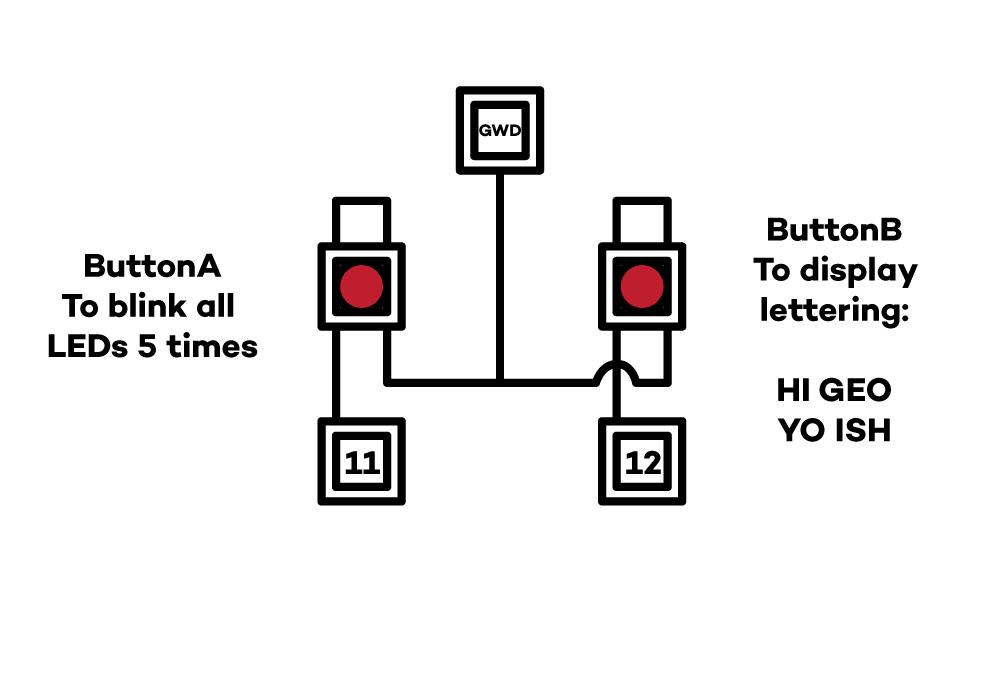
- 2 push buttons
The Setup
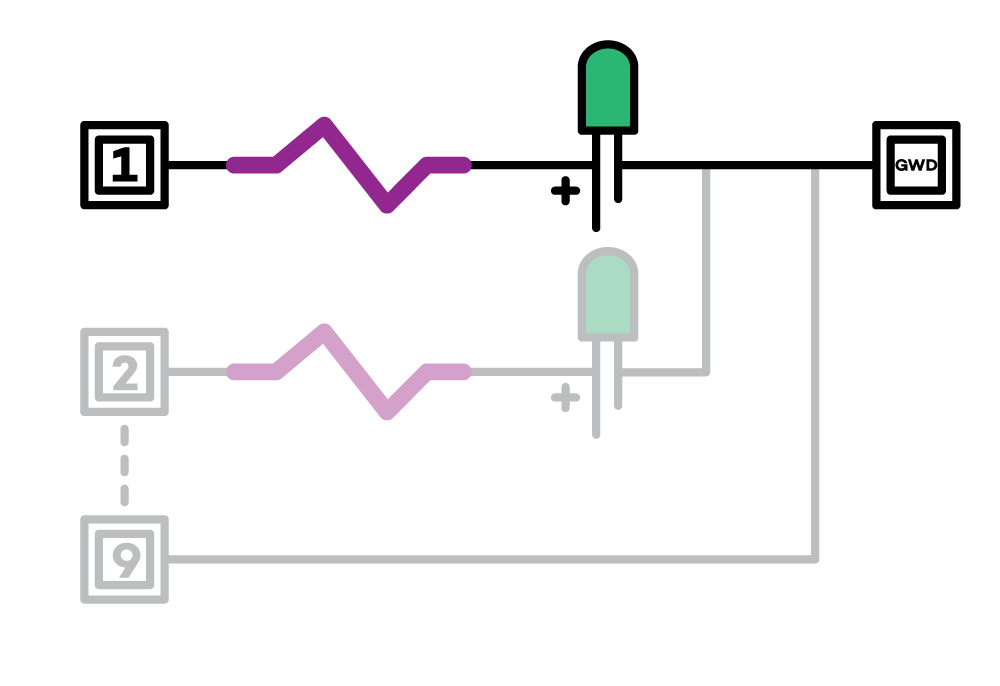
First step is to set up each individual circuit from the individual ports of the Arduino. A schematic of one circuit relay is shown below where a cable connects from port 1 to a series connection with the resistor and LED (NOTE: The longer end of the LED is the anode and has to be connected first after the resistor), after which it is connected to a common line to the Ground(GWD).
Arduino Codes used
Initialising the ports for the specific LEDs and Buttons:
int led = 1;
...
int led9 = 9;
int buttonApin = 11;
int buttonApin = 12;
Setting up the digital pins as outputs:
void setup() {
pinMode(led, OUTPUT);
...
pinMode(led9, OUTPUT);
pinMode(buttonApin, INPUT_PULLUP);
pinMode(buttonBpin, INPUT_PULLUP);
Serial.begin(9600);
}
Note: - pinMode() configures the specified pin to behave either as an input or an output. Serial.begin(9600) sets the data rate in bits per second (baud) for serial data transmission.
Creating the loop routine:
1. First operation of lettering the name with buttonA:
void loop() {
if (digitalRead(buttonApin) == LOW)
{
Serial.println("Button A Pressed");
//H
Serial.print("H");
digitalWrite(led, HIGH);
digitalWrite(led2, HIGH);
digitalWrite(led3, HIGH);
digitalWrite(led5, HIGH);
digitalWrite(led7, HIGH);
digitalWrite(led8, HIGH);
digitalWrite(led9, HIGH);
delay(2000);
digitalWrite(led, LOW);
digitalWrite(led2, LOW);
digitalWrite(led3, LOW);
digitalWrite(led5, LOW);
digitalWrite(led7, LOW);
digitalWrite(led8, LOW);
digitalWrite(led9 , LOW);
delay(1000);
In this loop, specific LEDs are turned on with the digitalWrite() function and turned off with the same using HIGH and LOW outputs.
The serial monitor output is also provided with Serial.println() to print and move to next line or Serial.print() to print and continue on the same line.
2.Blinking all the LEDs at delay(1000) five times:
if (digitalRead(buttonBpin) == LOW)
{
for (int x = 0; x < 5; x++)
{
digitalWrite(led, HIGH);
digitalWrite(led2, HIGH);
digitalWrite(led3, HIGH);
digitalWrite(led4, HIGH);
digitalWrite(led5, HIGH);
digitalWrite(led6, HIGH);
digitalWrite(led7, HIGH);
digitalWrite(led8, HIGH);
digitalWrite(led9, HIGH);
delay(1000);
}
}
Using a for() loop to repeat the code until it reaches 5 times and then stops.
Using the serial monitor input
The serial monitor has an input bar to input any character on the keyboard. The objective of this exercise is to light up the LEDs to display the character input on the serial monitor.
void setup() {
pinMode(led, OUTPUT);
pinMode(led2, OUTPUT);
pinMode(led3, OUTPUT);
pinMode(led4, OUTPUT);
pinMode(led5, OUTPUT);
pinMode(led6, OUTPUT);
pinMode(led7, OUTPUT);
pinMode(led8, OUTPUT);
pinMode(led9, OUTPUT);
Serial.begin(9600);
}
char rx_byte = 0;
void loop() {
rx_byte = Serial.read(); // get the character
if (rx_byte >= 'H') {
Serial.print("H");
digitalWrite(led, HIGH);
digitalWrite(led2, HIGH);
digitalWrite(led3, HIGH);
digitalWrite(led5, HIGH);
digitalWrite(led7, HIGH);
digitalWrite(led8, HIGH);
digitalWrite(led9, HIGH);
delay(2000);
}
}
}
Working